

Materials needed:
cardboard box (mine was 18" at its smallest width)
2+ yards of solid color (front and back), medium to heavy weight fabric
glue gun and LOTS of glue
Measuring tape/ruler
pen/pencil
utility knife (or something to cut the cardboard)
Let me note that most of my crafting is done in our basement, which means poor lighting, which means poor pictures quality.
First I pulled out the widest box I could find. We have lots, having moved twice in the past 2 1/2 yrs they have accumulated. I didn't want to use a typical round/tube type wreath because of how I wanted to add the fabric...and because I didn't want to buy one. (= I figured I could just cut out a wreath shape from the cardboard.
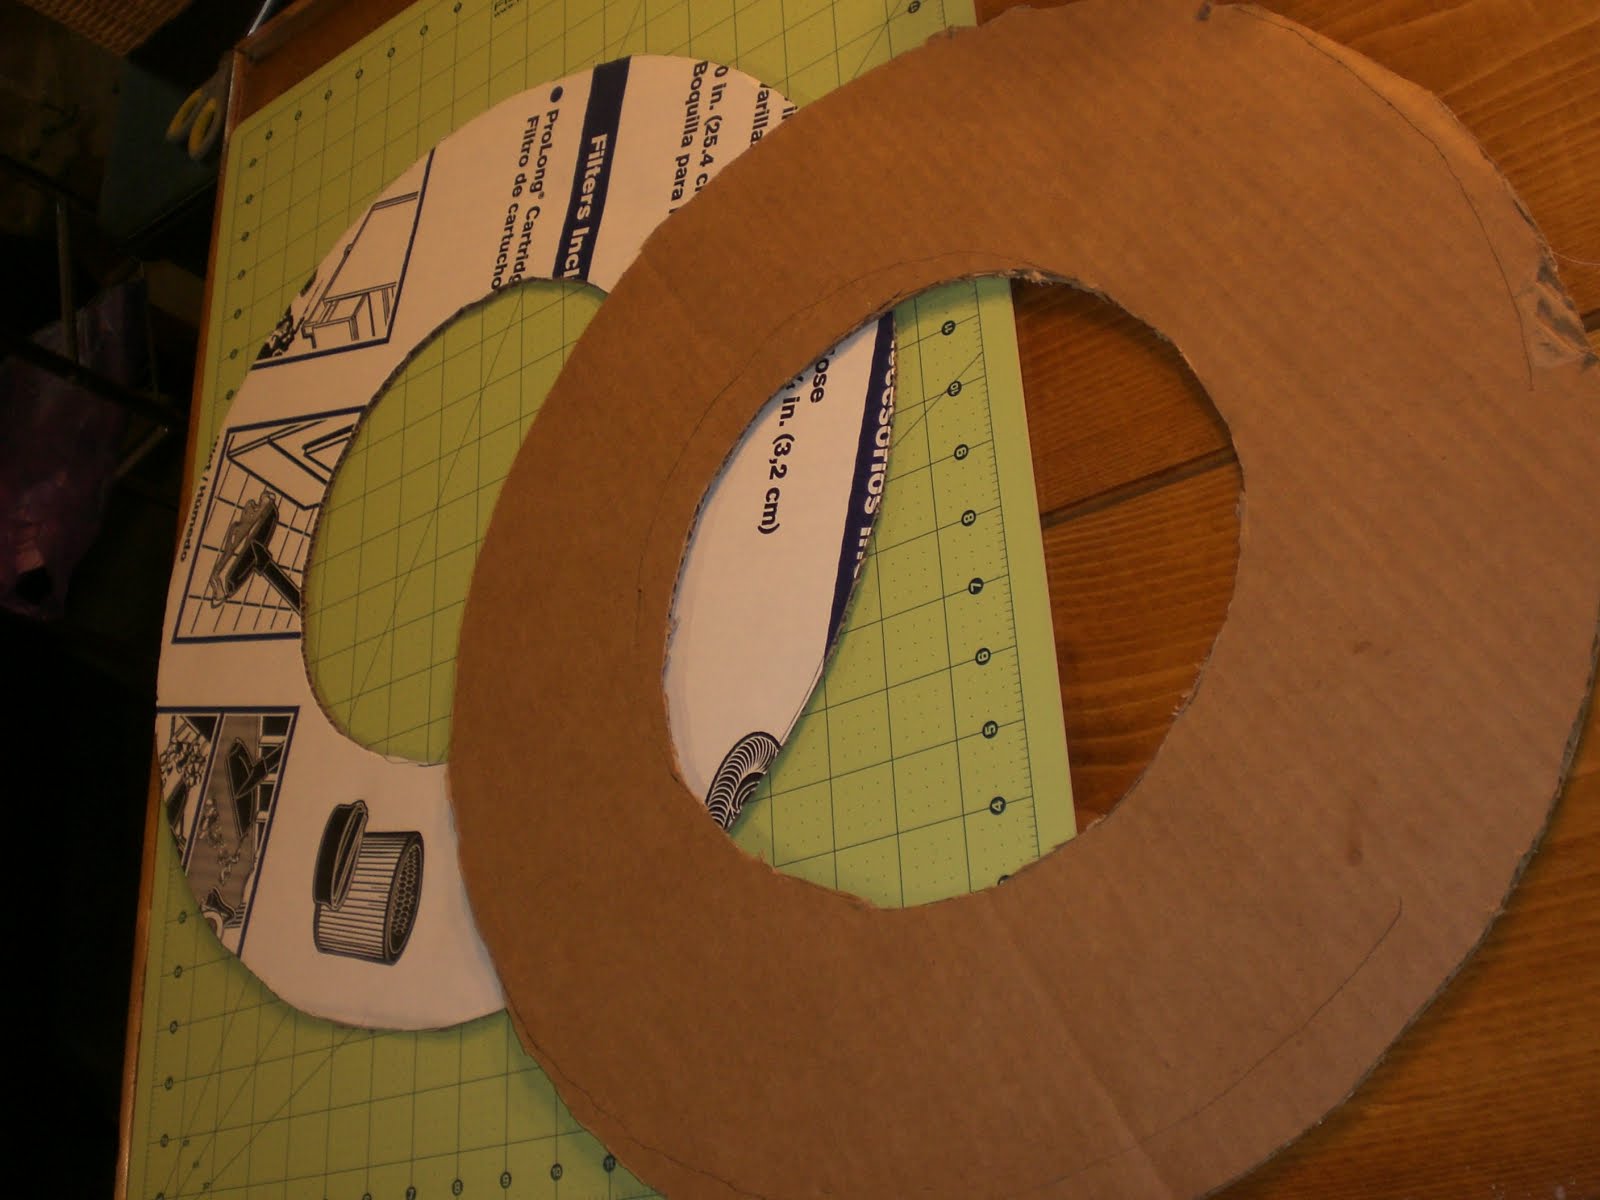
You could use a large plate or bowl to trace the shape, but I didn't have anything big enough. So here is what I did. I measured the SHORTEST width of the box's side, mine was 18 inches.

I made a mark the middle of the shortest width, and generally in the middle of the longer width. Now to mark your 2 circles. I lucked out because when I got out my ruler it had these little holes it in. I used a mechanical pencil and put it through the last hole in the ruler and poked it through the cardboard. Then I used a pen and marked two circles, using the second and third holes I traced all the way around the middle. Sorry if that doesn't make sense, maybe the picture will help.

Then I pulled out one of my hubby's handy dandy razor knives (you know, the ones that retract into them selves) and carefully cut along my two circles. Pop that bad boy out and then trace your wreath shape on to the opposite side of your box and cut out your second wreath shape. You might be able to get away with one, but I wanted to make sure it was sturdy enough. Then you glue the two together to make one sturdier wreath.
Ok, here is where you can learn from my mistakes. I've had 3 yards of this heavy, almost canvas like fabric laying around for years. I bought it for a project that I never finished. It was really stiff so I thought I'd wash/dry it in hopes that it would soften up...not so much. It came out a crinkly mess. Let me tell you, ironing it was no fun. I would probably recommend a home decor weight fabric.

Now it is time to wrap the wreath with fabric! I cut several strips, each 3 inch wide, from the longest length of my fabric.

Heat up your glue gun and get started. I glued the first strip to the back of the wreath at an angle and started wrapping, just making sure that the cardboard was covered. I used a little glue every couple times I wrapped the fabric to secure it.

By the way, my toddler LOVED playing in the box after I taped it back together. The holes are perfect to crawl in and out of.

Here is how it looked after I was done wrapping. I think it looks kind of like a mummy. haha


It is ruffle time! Again, I cute strips of fabric along the longest part of my fabric. I varied the width of each strip, from 1, 1.25, 1.5, 1.75, and 2+ inches. Then I cute each strip into several varied lengths. This next step is where my fabric gave me the most trouble. It did NOT want to ruffle easily. If you don't know how to ruffle, here is a good tutorial. I wound up having to do most of it by hand, pulling the threads to gather them (breaking a lot in the process). Here is my pile of ruffles. Ruffle away!

Pull out that glue gun again! Grab a ruffle, fold the width in half and pinch the end so that the two edges of the ruffles are between your fingers and the seam is on the bottom. Put a small amount of glue on the bottom of your pinched ruffle, along the seam and press it on the outside edge of your wrapped wreath.

Continue gluing down your ruffle strips, varying the wide and lengths of your ruffle as you go. Wind them around the circle until you've covered the front of your wreath.


I love how FULL the wreath looks despite being a flat surface (now do you see what I mean about not using a typical foam wreath form?)! I want to use this wreath year round, so I plan to change the way I decorate the wreath each season/holiday.

I was pressed for time so I just made this colorful flower out of a fabric scrap. I ruffled and then loosely glued it down (starting in the center and working my way into a larger circle) on a piece of felt. I glued a pin on the back of the flower because I loved it so much that I'd like to use it on a bag or something once the season changes. (=

If you use this tutorial, I'd LOVE to see what you come up with! If you post it somewhere, please link it back to me. Thanks, and enjoy!
*UPDATE* If you want to find out how to use this wreath all year, changing your seasonal decor, check out my new tutorial here.
***update***
Check me out at Blue Cricket Design! I joined her Show and Tell Wednesday and she picked THIS tutorial for a part of her Readers Rock! I am OVER THE MOON excited!

SHUT THE FRONT DOOR!!! Ack! My wreath was featured at Fireflies and Jellybeans as well! Thank you ladies! I am so honored.

another feature here


Wow that's so cool Sarah! I have some canvas-y type green fabric that I should try this with!! If I do, I'll definitely show you! Thanks for the step by step instructions! You are really good at explaining things easily! Jenn Pearson
ReplyDeleteThanks Jenn! Sometimes I get going and then wonder if if I totally ramble and make any sense, lol. I'd love to see it!
ReplyDeleteWhat a great wreath!!! love how you used what you had! Thanks for sharing!
ReplyDeleteThanks Jenni!
ReplyDeleteI love the ruffle wreath! So cute! :)
ReplyDeleteThanks for the comment Fawnda!
ReplyDeleteBeautiful!! I'm going to do this - thanks for the tut! :)
ReplyDeleteVisiting via Tatertos. Gorgeous. I really like that this wreath uses cardboard and not one of those styrofoam forms. Great job!
ReplyDeleteI absolutely love this! I want one!
ReplyDeleteThis really is cute. Great job. I am visiting from Tatertots, too.
ReplyDeleteVery cute idea!
ReplyDeleteWow, way to stick with it! I would of put that fabric away again and probably not even attempted to use it after the washer/dryer mess. But good for you! It looks stunning! I like the pop of color you did with the flower. Very inspiring idea.
ReplyDeleteThanks all! I got m y hubby to put a screw in the front door last night so I could finally hang it. Yay!
ReplyDeleteHey Sarah, I got a bunch of Christmas fabric so I'm going to try and make this wreath. I don't have a glue gun, do you have one you recommend?
ReplyDeleteHey Linda, the one I have is super basic and it works fine. I've had it for years, I'm sure it was one of the cheaper ones out there. I saw this one online and it looks pretty nice. I love that it can be cordless, that is the thing that bugs me about mine, the cord is old, bent and gets in the way.
ReplyDeletehttp://www.joann.com/joann/catalog/productdetail.jsp?pageName=search&flag=true&PRODID=prd58329
Good luck!
Great tutorial. You could use a cake circle (for about $0.40 at a party store) and only have to cut the middle out it if you didn't have a box big enough.
ReplyDeleteI've loved this wreath for so long and finally had the chance to make my own! Looks a bit different but still fun! :) http://www.katiestasiak.com/?p=1314
ReplyDeleteVery well done!! Thanks for sharing ... I've posted a link.
ReplyDeleteThank you Shari!
ReplyDeleteI just blogged about how I want to make your wreath, I used your title and linked it ;) Thanks for the awesome tutorial!
ReplyDelete