HTML/JavaScript


Thursday, December 31, 2009

It's snack time! (shh, don't tell the kiddos it's healthy)

I was looking for a recipe that was tasty, healthy and used ingredients I already had. Haha, I know, I want it all! I found a recipe for peanutbutter clusters, it wasn't quite what I wanted, but I thought I could work with it.

Here is what I came up with. It is something nice and easy that you can have the little ones help you with too.

Crispy Peanut Butter Balls

Ingredients:
10oz creamy peanut butter (I used approximately 1/3 of my 28oz jar)
3 TBSP honey (I just gave a couple good squirts)
1/2 cup raisins
1/2 cup oats
1/2 rice crispy cereal
1 tsp cinnamon

Put the peanut butter in a microwave safe dish and heat until it thins (it took me less than 60sec). Stir in the honey and cinnamon. Next, add the raisins, oats and cereal. Mix well. Use your hands (or even a melon baller) to tightly roll 1 inch balls. Chill them in the refrigerator on wax paper for several hours. Then enjoy!

These were Jocie's after nap snack today. She loved them (I thought they were pretty tasty too)!

the evolution of a Christmas gift

There are some people that I have a really hard time shopping for. Billy's oldest sister is one of those people, I don't know why but every year I struggle. This year I was hoping something would just jump off the shelf at me with her name on it, crazy, I know. I saw this super soft, comfy, cozy looking cowl neck scarf and thought, this totally looks like her! At the same time I thought, hmm, maybe I could make some cute accessory to go with it, a pin or broach or something...maybe.


For those of you who don't know me well, I am a very indecisive person. I knew I wanted to do some sort of pin/or set of pins for her to wear on the scarf. But, oh man, to narrow it down. There are just too many good ideas out there!

I came across this really cool, not so traditional, wreath. I loved the stacked circles, random stitches, and groups of buttons. I figured I'd try this concept as a set of 3 pins that could be worn together, or individually.
This is what I came up with (before buttons)

I actually kinda like them, although I wasn't in love with my stitching pattern on the largest one. My problem came in trying to group buttons, ugh. I just couldn't seem to get it right, or to the point where I liked it enough to give it as a gift.

On to my next concept. I had seen this tutorial and thought maybe one big flower would be cute.
Attempt #2:

Blah. The colors, the fabric, it just didn't work for me. So I took it apart, added some cream and dark blue tulle and a new button.
Attempt #3:

Ok, this one was better. Definitely an improvement, but still not good enough. I had a hard time with the gathering(?) on the back and it didn't seem to have enough oomph. Have I mentioned that I tend to be my own worst critic?

It was the week before Christmas and I was getting a little discouraged, my grand idea was turning out to be a bit of a dud. I picked up some simple black gloves at Target in hopes that I could come up with something to coordinate the two, but I really didn't know how.

Then I came across a tutorial for a simple pleated flower and I LOVED it! This might work! The first I did was a large flower with a pin on the back for the scarf. Ok, a moment of honesty here. I don't always get along with my glue gun. I'm either too slow and the glue dries before I'm done, or I can't stop burning myself. Apparently that day burnt fingers were the ticket. I got the pin done and wanted to make two smaller, matching flowers for the gloves, only this time I got out my trusty needle and thread. It may have taken a little longer but I felt like I could take my time with the placement of the pleats and I was more confident that it would hold up together. This time I was THRILLED with the results!
Attempt #4:


I was so glad I kept going because in the end I loved it all, the fabrics, the buttons, how it all coordinated! Yay! I think my sister-in-law liked it too because she put on the scarf when she opened the gift and still hadn't taken it off when we left.

I liked it so much that I decided I need new(er) gloves too! I had two old, rather boring pairs of gloves sitting in my pile of winter gear so I grabbed a few fabric scraps, buttons and let myself go!
Here is what I came up with for myself

For the black gloves I simple ruffled a small strip of white jersey and stitched a black button on top of it. For the cream I wanted to use all similar tones. I used some taffeta(?) to create my first ever yoyo some, added a little tulle and button.

I thought the yoyo flowers turned out too small so I cut another strip of the taffeta and tulle and stitched a quick ruffle about half way around each flower. I think it turned out pretty cute!

Two pairs of old gloves, not so boring anymore!

Monday, December 28, 2009

2 new sweater refashions

I've had this sweater for a couple years but hadn't gotten much wear out of it because it just never fit quite right. I loved the knit and the collar so when I saw this sweater refashion I knew what to do I just love that site!

I love how it turned out! I snipped the sleeves, it was such a loose knit I did have to stitch where I cut and then I adjusted the fasteners to correct the fit.

I didn't think the vest needed a belt, but I wanted to make use of the sleeves so I thought, arm warmers! I snipped them so they were even, turned under that side a few times and stitched it down. It stretched a little, but I think still turned out cute! I love the scalloped(?) edges and the fact that when I wear it over another colored shirt it peaks through! I would have cut a hole for my thumb if it hadn't been such a loose knit. Wouldn't you know that they very next day I saw the "slove" posted on My Mama Made It! I'm telling you, her refashions rock!


I thought I had another old sweater that might not be such a loose knit, so I dug through my pile and found this.


This time I was able to do a true "slove". I cut the sleeve right off at the arm pit so I can really slouch it. I may still add an embellishment...we'll see.


I've seen a lot of cowl neck scarfs this season and so far had been able to restrain myself from buying one, lol. I've been dying to try one out. I looked at the rest of sweater and thought, hmm, YES! Wouldn't you know that the same site has a similar refashion. I cut the body of the sweater just below the armpit, above the thin gray stripe. I think this sweater will hold up without stitching it, so I just left it! Boy, this was the easiest refashion ever!
sorry for the dumb look, I hate taking (and being in) pictures

Yay for several new FREE looks!

Woo, I think that is it for tonight!

Felt Mr. Potato Head = great plane toy

I think I my have swooned a little when I saw this felt Mr. Potato Head tutorial. What an amazing idea! I'm not sure if velcro is quiet enough for a church service, but it would be PERFECT for a plane ride for FL. I had hoped to get this done before Christmas, but my final goal was to get it done before Jocie and I leave for FL on Jan. 10th (wahoo!!!). I started it during nap time yesterday and then had some unexpected craft time when Billy had a friend over last night to watch football. I guess I really go into my groove because I got it DONE! I really love how it came out. Jocie found it today and had fun with it. I'll have to find a better hiding place for it until our trip, hmm.

Meet Mr. (I love his jaunty mustache)


and Mrs. Potato Head


Here are all the pieces, potato with velcro, and the big back pocket


Jocie preferred the mash-up face

Friday, December 25, 2009

Merry Christmas (and more holiday refashions)

We had a wonderful Christmas, I hope you did too! Lots of family, food, gifts...now laying on the couch watching Elf (wouldn't be Christmas without that, would it).

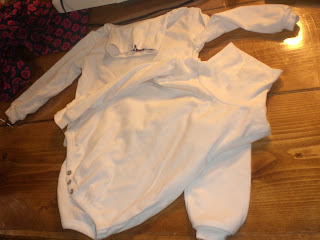
I thought I'd share a couple more holiday refashions with you. I bought this shirt last year (again, likely 90% off). Not really my style so I wondered what I could do with it.

I didn't love the fit so I snipped it right up the center and then had to figure out how to cover the hanging ornaments. Ok, side note here. One of my absolute FAVORITE blogs for refashions is My Mama Made It, LOVE her stuff. I've spent hours on her site just browsing her great ideas. I saw this refashioned shirt by her and thought it might work for my shirt.
What do you think? It is a little dramatic, but kinda cool I think.


back


My next refashion was a dress for my girl. I had 4 shirts (yes, 4) that were a size too small. I had planned on creating 2 Christmas-y shirts for Jocie but forgot I had them until just a week ago. Hmm, what to do now? THEN I saw this beautiful Winter Wonderland Dress on Ruffles and Stuff and knew that was just the thing! Here is what I started with...


Initially I stopped here, but decided it a little more. I think with the leggings she looked like a little elf, heehee.


I added several ruffles at the bottom and the "snowflake" puffs on the front. She wore it to Billy's work Christmas party (for those who don't know, he works at a hardware store, this the background in the pics).


Monday, December 21, 2009

burp cloth tutorial, my very first!

I'm so excited to be able to post my own tutorial! I love these burp cloths, and they are so simple to make. I did some searching online until I found a pattern I liked, I didn't actually follow their directions. Instead I pieced together techniques I liked from various blogs including Small Fry & Co. blog and Homemade By Jill's blog.

What you'll need:
flannel
one cloth diaper (you want to buy the flat diapers which came in a package of 12, NOT the prefolded)
pattern

First you will want to wash and dry your flannel and the diapers. You don't want then to shrink at different weights AFTER you've sewn them together.

Iron your flannel and diaper. Fold your diaper in half so that the shorter sides meet at the ends. Lay the folded diaper on the wrong side of your flannel (the side you don't want to be seen) and pin your pattern to the diaper and flannel.


Cut out the pattern and you will be left with this, flannel on one side and diaper on the other. Leave your fabric together and pin around the whole thing.


Your next step is to do a straight stitch about a 1/2 inch from the edge of your burp cloth, all the way around.


In order to hold it all together I like to add one straight stitch right down the middle (long ways). In order to find the middle you can fold it in half and either put a few pins in or iron a crease. My flannel fabric happened to be striped so I was able to find the middle stripe and stitch along that.


Once you are done with that, this is what it will look like. The last step is to take a small pair of scissors and make small cuts, about 1/4 apart, all the way around burp cloth. Just make sure you don't cut through the stitches.


Throw them in the washer/dryer a couple times and the edges will fray and the whole thing will be extra soft and cozy.


I like to roll up a couple and tie them together with a ribbon as a gift. They go nicely with the crinkle taggy blanket as you can use the same flannel for a cute, coordinating set.

Enjoy! Let me know if you try it out, I'd love to see what you come up with!

***I just had this thought and had to share. I LOVE being able to reuse things and if I ever have another girl I will likely use several of the countless flannel receiving blankets I still have as my flannel for the burp clothes.

snickerdoodles and snow

We were snowed in over the weekend so I decided to make snicker doodles for us to enjoy. I got this recipe from my Mom and people always love it, so I figured I'd share...

Snicker doodles
1 1/2 c sugar
1/2 c soft margarine
1/2 c shortening
Cream until fluffy

1 egg
1 egg white
Add to creamed mixture. Stir well

2 3/4 c flour
1 tsp baking soda
1/4 tsp salt
Combine separately, then add to creamed mixture. Place tsps of dough on ungreased cookie sheets. Sprinkle each cinnamon/sugar.

Bake at 400 for 8-10 min


We had a great time playing in the snow! This was Jocie's first really significant snow experience. I've been bringing in big bowls of snow for her to play with all weekend.


see how deep that is? We probably got 17-18 inches.