HTML/JavaScript


Wednesday, June 30, 2010

sometimes it pays to buy big

I seem to find more clothing on the clearance rack that is too big, than in my size. This time it paid off to buy a bigger size! I found this little dress (ok, technically I found it with the sleepwear) for just over $3. It was 2 sizes too big, but it was SO comfy and perfect to go with my new summer obsession...leggings!

Blah, shapeless


I put it on inside out, stuck a few pins, 5 minutes under the sewing machine and...


Yay for a new summer dress!

Monday, June 28, 2010

I have been waiting to post this!

I was so excited about this project! I just took part in a gift exchange between some other mom friends. I mailed out my gift, but wanted to wait until my friend received it before I posted this. This was so much fun! I wanted my sweet friend to feel like she got something special and one of a kind. She gave me a few ideas, and here is what I came up with.

She said she likes simple jewelry, so when I saw this idea for button earrings, I thought how CUTE!!! I had a hard time finding the plain, silver, earrings to work with, but I finally tracked them down. I think they came in a pack of about 30, so I could do LOTS more if I wanted. haha
I made two pair, one all black and the other was a pearl-like white with a white ribbon. I WISH I could wear these, but my ears just freak out.


She also said she wanted a storage basket to organize her daughter's loose CDs. I found two baskets that I liked the size and shape of, but not the color.


After LOTS of spray paint, LOTS of hot glue, some home decor fabric, ribbon, cardboard and scrapbook tags...This is what I had.


The smaller of the two I designed specifically for storage of loose CDs. I used fabric along the bottom and ends inside the basket so that the CDs wouldn't get scratched. Then I covered some pieces of heavy cardboard with fabric (not my original idea, can't remember where I saw it though) and attached these little scrapbook tags so she can divide and label what is in the basket.


For the larger basked I just sewed a simple slip cover for the bottom (it was easier than I expected), wrapped ribbon around the top, and added several pleated flowers with more scrapbook tags.


I really enjoyed this project! I really hope she gets a lot of use out of them. She definitely deserves something special!

Thursday, June 24, 2010

favorite animal?

My daughter's favorite animal is a turtle. A little random, but we go with it. It is hard to find turtle things for her, it is not really the most common animal for kids. She was never really obsessed with or gotten attached to anything, until the turtle. It was the first animal she started identifying by name rather than sound (does a turtle make a sound?) and she started pointing out turtles wherever she saw them. Thus the random turtle paraphernalia around our house. I used this tutorial and just changed the shape of the animal. I used one of her turtle shaped puzzles to come up with my shape to trace. I don't think it turned out to be the most obvious turtle shape, but she still likes it.

Here is the front and back. Oh, and I forgot to add the "eye" so I just stitched in that spot.


Here she is, snuggling with her new turtle, laying on her turtle Hugga Pet and watching a movie.


I love my girl.

Wednesday, June 23, 2010

feeling patriotic

It is so close to July 4th, I figured I really needed to update my wreath. I whipped up a few felt flowers in white, red and shades of blue. Yay!

I hope you are not sick of my Ruffle Wreath, because here it is again!


I LOVE being able to change the season decor on this wreath so easily! If you want that tutorial, you'll find it here.

I liked up here...

Show and Tell Green


Sunday, June 20, 2010

Happy Father's Day!

We had a nice day together as a family. My hubby woke up to fresh coffee and homemade cinnamon rolls. Jocie and I gave him a photo card (my new favorite thing, from Shutterfly) and a "Dad" t-shirt, he already got a new set of golf clubs. My hubby has a couple of "Dad" shirts that he has pretty much worn threadbare. I really wanted to make one myself so I could come up with my own phrase. I attempted my first ever freezer paper stencil (check out a tutorial here, she is pretty much the queen of this technique). I like the way it came out!

Here is my hubby, struttin' his stuff in Lowes this afternoon. He's hot stuff!


Funny story, I got the crown silhouette from this website and save the file on our desktop. I forgot to delete it once I had adjusted the size and printed the image. He saw it and I had a good time listening to his guesses about how it related to his gift. Haha! It was a pretty simple thing to do, the most time consuming part was cutting out the stencil, I think I'll get a better cutting tool the next time I try this.

Friday, June 18, 2010

Waiting...

I'm sitting at home waiting...for a camera crew to show up. What?!? I'm SO nervous! A local up and coming website is becoming a hub for consumers to find local businesses. My hubby and I are friends with the men who started it and they asked if I'd be interested in having Sunshine Baby Nursing Capes on their website. Again, what?!? How cool is that! I'm not sure what to expect, just hoping I don't make a fool out of myself on camera.

Wednesday, June 16, 2010

Father's Day is around the corner

I want to know what your (or your hubby's or dad's) favorite "Dad" slogan is. My hubby has a couple of "Dad" t-shirts that he wears all the time. One is says "Dad 07", which is what he wore at the hospital the day our daughter was born. The other says "A man who changes diapers, changes the world". Eventually our daughter will be potty trained and he won't be able to wear that one any more.

How about you?

Tuesday, June 15, 2010

two new tanks

Whoa! We are having some summery weather here! I really need to keep up with my spring/summer refashions. I found two plain tanks at Target, I liked the style and fit, but blah...I couldn't stand adding more plain tops to my wardrobe. These refashions were SUPER simple.

As usual, I was impatient and didn't take before pics. They were plain/solid tanks with a yoke type neckline and a bit of gather in the center.

I finished the purple one first. I cut a strip of fabric, about the same width as the yoke neckline, from another tee with a coordinating pattern. Then I pleated it along the yoke, with no particular pattern. Then I stitched both sides down. After washing it, the edges curled just a little.


I'm not sure why, but black is a very prominent color in my wardrobe. I really try to branch out, but I always seem to drawn back. Anyhow, this is my attempt to bring a little color in. A couple of bright blue flowers.

Saturday, June 12, 2010

hazard pay?

My hubby says that doing projects for weddings should come with hazard pay. Haha! Please tell me I'm not the only person who stresses themselves out when sewing for other people. But seriously, could you imagine messing up something for a WEDDING?

It was a relatively simple project, a friend of a friend wanted a different color tie for the corset of her wedding gown. I decided to try a new technique. I thought a bias cut/sewn piece might work better since it would have some stretch. I used this bias tape tutorial (I just skipped the ironing part). It was definitely something new, made me a little crazy, but I can see how it would be simple and time saving if I had a little practice. My hubby also says I make myself needlessly crazy over these things. I wasn't satisfied with my first attempt, so I made a second tie, this time just a straight cut. The poor bride was probably so confused to get two, haha. Oh well, I was happy to be able to do just a little something to make her wedding what she had dreamed of.


I wanted to do a little something unexpected, so I figured a pretty little flower pin was in order. I finally tried this singed flower technique. I think I'm addicted! It was so easy, and I love the result.


I hope the wedding is beautiful and live happily ever after!

Friday, June 11, 2010

Yay or nay?

I made over a $0.25 headband from Target. I can't decide...I wonder if I misplaced the fabric flowers. Help me decide


SQUINT in the sun, ugh

Monday, June 7, 2010

the boys in my life

My brother and sister-in-law having having a little girl in September. I've been so excited about creating cutie-pie baby girl things that I started to feel like I was neglecting my favorite little boys. I found some cute little boy fabric at Joann's and got to work.

For the older of the two boys (who my daughter just adores), who loves anything that goes VROOM...


I used Homemade by Jill's Cozy Car Caddy tutorial.


For sweet baby boy I used the tutorial Disney guest posted at luvinthemommyhood.


I think I may actually make one for Jocie too because she was obsessed with it too, lol.


I think it may be my new favorite craft for babies.

Saturday, June 5, 2010

Breast feeding and baby wearing

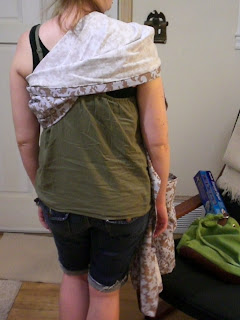
These are two of my favorite "baby" things! I already make and sell nursing capes, so when a mama asked if I'd try my hand at making a ring sling to match her cape I was excited! She had bought the last nursing cape in this fabric (pretty, isn't it!) and I had to do quite a bit of searching to find it again. But, SUCCESS, I found it, and bought enough to stock the shop as well since it is a popular fabric with mamas of little boys.

I have a ring sling of my own that I bought cheap on ebay (before I knew the wonders of etsy) from a woman who made them. It was a total life saver for me. My daughter wanted to be attached to me 23/7 and wouldn't sit happily in a shopping cart or stroller until she was at least 11 months old. I still occasionally pull it out, like when I travel alone with my toddler, or when she isn't feeling well and wants to be held although my arms are about to fall off. I love how simple they are to use (at least after a little practice), how many ways they can be used at so many stages, that they are washable and take up so little space in a diaper bag.

I was referred by a few friends(thanks Heidi and Alyse!) to order the rings here and tutorial here (btw, they have some great instructional videos for use and wearing as well). I asked the mama if she'd like me to add anything to it and she requested a large pocket and loop to hook keys or a paci clip to.

As usual, I forgot to take the time to get good pics of this project. I was about out the door to take it to my mama friend and asked my hubby to take a few quick pics. I didn't even take time to make sure it was really straightened out, ugh. You'll get the picture though.


This has a shoulder cap (mine didn't) which distributes the weight a little better


close up of the pocket and loop


Yay for baby wearing!

Thursday, June 3, 2010

Think Pink! One wreath for all seasons (a mini tute)

Hi all! Do you remember my Ruffle Wreath? Here is what it has looked like since I finished it a while back.


I had said that I wanted to be able to use this wreath year-round, changing the decor for the season (or just because I get bored, lol). But I hadn't really figured out a good way to do that...until yesterday! I first created the decor I wanted to use (will get to that later). Then I pulled out a piece of felt, and cut it in the general shape of the section of wreath that I wanted to cover (be sure it isn't larger than your wreath). Next you will want to attach your decor to the felt (I laid them out on the wreath to get the placement I wanted), I simply used hot glue. Trim your felt piece so that it is not visible around your decor.


Then you'll want to pull out some sticky backed velcro. You'll only need the scratchy side. I cut several lengths and stuck them to my wreath where I knew the decor piece would be (I used two at the top/inside edges, and one at the bottom/outside edge). Note: this would certainly be easier to do with a wreath that had a flatter surface, but I made do.

*Update*: my sticky back velcro became gooey and not so sticky after a few days of my wreath hanging on our front door in the heat and humidity. If your wreath is going to hang outside, I would suggest using some strong adhesive so that it stays put. I swiped some of my hubby's liquid nails, and the velcro hasn't budged since.


All you need to do now is firmly press your felt-backed decor piece onto your wreath, and hang! Wahoo! Now, when you get bored or the season changes all you need to do is cut another felt piece in the same general shape and decorate!

Here is my Ruffle Wreath (you can find the wreath tutorial here) with its updated decor!


Right now I am thinking pink for Breast Cancer Awareness! I used pink fabric and ribbons from my stash to make these flowers (the white in the center of the large flower are little pom poms).


This Saturday I am participating in the Susan G. Komen Race for the Cure. My grandmother and cousin both lost their lives to breast cancer, and there are several member's of my husband's family who have been touched by the disease as well. I am humbled to be just a small part of this.

Go team WoCoChaJo Girls (although we may need to change the name as my father-in-law is walking with us as well, lol)!


Linking up here


Show and Tell Green


Join us Saturdays at tatertotsandjello.com for the weekend wrap up party!