HTML/JavaScript


Friday, January 8, 2010

FL here we come...with new DVD case in tow!

I'm so excited about our trip to FL! Jocie and I are going to spend 10 days with my parents. It's been so cold up here, I really hope FL warms up before we get there. lol I think I've finally finished that projects that I "had" to get done before we left. Remember me mentioning the DVD case when I made the case for our camera? Well, it is done and will be great for taking the DVD player on the plane with us.

I bought this purple fabric a while ago to make nursing capes, but I wound up with almost 6 yards so I have LOTS of it. I did make my sister-in-law a cape with the fabric and love the way it turned out. I figured it would work well for this project too. I used this great tutorial again, only I made a shorter strap for simply carrying it by hand.


We just have a portable DVD player so I debated whether or not to add the divider inside, but Billy thought it would be good to have a section to carry a couple DVDs as well. The only thing I would change is that I would have skipped the batting for the divider, it really wasn't needed for this one and just added bulk.


Here it is with the player and 2 DVD cases in it. I found two cases that house two DVDs each, I took out the paper cover and put two of Jocie's DVDs in each. That way we have 4 movies that only take up the space of two.

Here is the back pocket with the cords. Yay!


Here's hoping I remember to have it fully charged for our trip! (=

Thursday, January 7, 2010

Tutorial: EASY fabric flower (and a sneak peak)

Alright, I really hope this makes sense because it is late and I am tired.

In order to make this fabric flower you need at least long strip of fabric, several inches wide. I used two colors, a gray cotton and black corduroy, but you can use whatever you'd like.

You are going to cute squares out of your fabric in varying sizes. My squares ranged from 6 to 3 inches, I cut seven total squares.

Here is a really easy way to cut semi-even squares without having to measure, mark and cut. Grab hold of one corner of your fabric strip and identify approximately how tall you want your square to be. Now make one cut into your fabric at that point. Take your first corner and fold it into your strip so that it forms a triangle. You want to line up your existing edge (the side) with the cut you just made. Press your fold down and hold it with your thumb/finger and cut along your triangle shape that was formed by your first corner. Open it up and now you have a square. I hope that makes sense, it is a lot harder to explain it in writing than it would be to show you.


Now that you have your squares you need to cut out some flower shapes. Take one fabric square and fold it so that you have a rectangle. You are going to make two curved cuts, one on either the left and right. You can trace a small round object with a flat bottom if you want your curves to match (I usually just eyeball it, after all flowers aren't perfect, right?). Here I used a spool of thread and a piece of chalk to mark the curve on my black fabric. Notice that my fold is at the bottom and the curve goes out to either of the top points. YOU WANT TO BE SURE TO LEAVE SOME OF YOUR FOLD INTACT, DO NOT CUT ALL THE WAY THROUGH! This is important for your flower to stay together.


Open up your fabric after your first set of cuts. You should have a bow tie type shape. Notice the center is the portion of the fold that you left intact.


Fold the "bow tie" in half with the curves on top/center. Your fold should again be at the bottom between your fingers.


Repeat your previous curve traces and cut along those lines. You can round the tips of the curves at this point if you'd like, I left mine. I liked the slightly pointed ends.


Once you unfold it, you will have a general four petal flower shape. Repeat this with each of your squares.


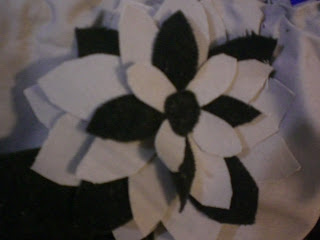
Starting with the largest working to the smallest flower piece, lay them one on top of the other. Arranging them so that they create a full flower, you don't want pieces laying directly on top of each other blocking the one behind. I cut a small circle out of the black fabric and used that as my middle, you can use anything you'd like though. I put a few stitches through the flower to hold it together and then stitched the finished flower on my new tote bag (for the upcoming plane ride to FL, yipee!). Sorry for the blurry pics

Sneak peek at my new bag! Love it! I'll try to post it soon

Tuesday, January 5, 2010

Tutorial: use old socks to lengthen sleeves

This idea has been floating around in my head for a while, as I mentioned in my post before, I seem to have longer than average arms and have a hard time finding long sleeve shirts in the correct length. I fear that I may have passed this along to my daughter. She's kind of thin and her little wrists (and tummy) tend to stick out of her sleeves WAY before the shirt is too tight. I just had to buy her all new socks because her feet are growing and I've procrastinated far too long. Now I have all these little socks where the soles are either holey or so dirty that I have a hard time justifying keeping them.

I found this super thick and soft sweat shirt on the clearance rack (see the soft pink fuzzies on the inside). It was a little boring, and it was an 18-24 month, but Jocie is really closer to a 2T. It actually fit ok, but I knew the sleeves wouldn't last too long. I happened to have a little pair of ribbed, fold over socks (triple roll would be even better though!) in the same pale pink in my stash. I figured the ribbing would mimic what was already on the sleeve, so here is what I did!


I cut the top off the sock, straight across right before the heel.


I turned the sleeves of the sweat shirt inside out and then stretched the top (ribbed) part of the sock so that it would fit over top of the sleeve.


There really wasn't a right/wrong side of the sock so it didn't matter which side I paired with the inside of the sleeve. Figure out how far you want the ribbed part of the sock to stick out of the sleeve and pin it securely to the sleeve. Be sure that it is not crooked (you can line it up with the seam on the sleeve) and that both sleeves are even. Because the sleeve was so small it was easier to simply hand stitch it on. I didn't want the stitches to show on the outside so I simply felt as I went and only stitched through the sock and the first layer of the sleeve.


Once you turn the sleeves right side out, you can either use the sock as a cuff or pull it all the way out to lengthen the sleeve. If I do this for myself I will likely snip a small whole for my thumb, but I knew my 2 year old wouldn't go for that.


Now to fix the "boring" part of the sweat shirt, it now had pink cuffs to match the inside fuzzies, but I wanted something else. I cut the top foot part of the sock, as much as I could use that wasn't dirty. I cut as many flower shapes as I could, in a range of sizes. I stacked them, largest on the bottom to the smallest on top. I had some "bling" in my stash and I just stitched it all together on the shirt. Tada! A much cuter sweat shirt that should now last her through the rest of the winter.


I LOVE being able to make use of things that would otherwise have been thrown away!

Monday, January 4, 2010

a refashion, new camera case and one less craft for me to tackle

Why do I buy things that don't fit me? Oh, that's right, because it was stinkin' cheap. Oh well, at least now I am able to do something about it. I think I bought this shirt postpartum because it was loose in the front. I do tend to buy long sleeve shirts a size too big because apparently I have longer arms than the normal people. There is not much I hate worse than having sleeves that are just a little too short. Anyhow, back to the refashion. I snipped up the front, cut the back panel straight across at my waist and then cut a deep angle to the front. I had some cotton in about the same shade of green, so I created this this tie in the front. I think it looks a lot cuter in person than it does in the picture. By the way, sorry for my crappy picture taking "skills".


At some point during our moving around this summer, our poor little digital camera lost it's case. I found an old zippered change purse that it (sort of) fits in. I'm not sure Billy appreciates that it is pink and flowered though. I had seen a tutorial for a tote to carry a portable DVD player and was able to use the concept (yay for quilter's batting in Joann's remnant bin) to make a little padded case for my camera. I think it turned out cute!

the front, with velcro

the back

I'm actually planning to do the same type of thing for my new TomTom GPS that I got for Christmas, it makes me nervous to just throw it in my purse. But first, I hope to get one made for our portable DVD player. I need to get on that so it is done by the time Jocie and I leave next week! Yikes!

I had planned on making Jocie an apron, I even had a couple old, but unused, dish cloths that I was going to use. She has her own little play kitchen, and she has really started to enjoy "helping" me in the kitchen. Then, on one of my (frequent) trips to Target I noticed a cute little apron, AND chef's hat, in their "one spot". It was marked 50% off, but when I got to the register it rang up at $0.25 each. I got both for a whopping 2 quarters! I can't beat that! She surprised me and was actually excited about wearing the hat!

just call me...The Bargain Finder


This was my "loot" today. I spent $11.92 at Target today, and I saved $64.21. Ahh, it was a good day.

Sunday, January 3, 2010

$1 crafts?

Did you know that there is a whole website dedicated to Dollar Store Crafts? Even better, they have their projects broken down into price categories, the one I like is the $1-free section, lol.

I saw this idea of using a shower curtain (liner) as a play mat, you can draw designs on it and let the kids color the whole thing. What a great idea for those cold days that you are stuck indoors. It might be a little better for older kids who understand coloring a little better, but still cute! Just thought I'd share.

Friday, January 1, 2010

Another homemade Christmas gift: diaper/wipes/changing pad

I told Billy that next year I'd love to make most, if not all, of our Christmas gifts. I really enjoyed the few I made this year. My other sister-in-law requested another nursing cape (for those who don't know, I make and sell nursing capes) so that she could have one in each of her bags. I went on the hunt for some new fabric because I didn't have too many that were "boyish". I was excited that Joann's had some new blue/brown patterns so I picked a couple up. This is the one she picked. I think it looks really cute as a cape, bummer that I forgot to take a pic.


I still really wanted to make something else, so I figured I'd work on an idea that had been floating around in my head for a while. Does anyone else have a pouch that holds diapers/wipes and a changing pad? Now I want to know how long it was before you walked off and left your changing pad somewhere, never to see it again? I really wanted to find a way to create something to hold diapers and wipes that was also a changing pad so that you could wrap it all up when you were done and not leave the pad behind. I've looked(some)to see if I could find anything similar being sold. I couldn't find what I was looking for so I figured I'd create it myself. I used the same fabric as the cape for the outside material, and then I used the same tan flannel as the nursing cape's pockets so that the side you lay the baby on is nice and soft. When it is folded up it looks like a cute clutch purse with a ribbon tie.


I added two pleated pockets so there is LOTS of room for both a wipes case and several diapers. I used a strip of the patterned fabric in between the pockets to add some visual interest on the flannel side.


I stitched one seam parallel to the pockets so that it would be obvious where to fold the changing pad.


I'm pretty happy with how it turned out! I think I'd make it a little smaller next time and possibly use a different fastener, but we'll see what she thinks after using it for a while!